

With Easter coming up early this year, I wanted to make my daughter a special holiday shirt that could be finished in an afternoon. Of course, I also wanted to try something new. Can you believe that I still haven't tried embellishing with rhinestones yet?
This year I am back participating in the Silhouette Challenges, but this year there will only be 4 group posting dates. Okay, I am a little bummed, but I am excited to play around more on my own time and hope to post those projects as well. This month's challenge just happened to be with fabric.
Oh, be sure to stick around for the whole post, there is an amazing giveaway near the end... plus more great inspiration from my fellow Silhouette Challenge members. :)

Okay, back to the shirt.
As much as I love my daughter in Easter dresses, she is more of a rough and tumble girl. She would much rather have fun and play hard in a holiday shirt. I wanted to add a little sparkle to her shirt with both glitter heat transfer material and a few well placed rhinestones.
For this project you will need:
- Heat Transfer Material (I chose white with glitter)
- Rhinestones (I used pink, blue, yellow, green, black and clear)
- Iron
- thin towel or pillowcase to place over design during ironing
- Easter Egg Cut Files - from the Silhouette design store
- Pick-Me-Up Tool *optional, but very handy!
I don't have a cut file to share with you for this project. I found 2 different designs that I loved in the Silhouette Design Store. They were each $0.99. I used this set of 3 Easter Eggs, as well as this Easter Egg Card design.

So I downloaded the designs, brought them into the software and then deleted the layers or items I didn't need. I didn't want to do a lot of extra weeding or aligning, so I wanted to weld the 3 egg shapes together.

To weld, so the objects will be cut out as 1 image, overlap the designs, then select all three eggs. The menu at the top right is where you will find the modify menu. This drop-down menu has the weld function.

Once all the images are connected, cut out the heat transfer material as usual. I always make sure to double check my cut setting and blade depth to prevent headaches later.
.
Applying the heat transfer material is super easy, especially when it is only one solid piece. Once ironed on, it was time to embellish my Easter Eggs with a little color. Tulip has a great variety pack of heat-set rhinestones if you don't have a stash already.
Also, this was my first time trying out the Pick-Me-Up tool. It was awesome! One end is sticky... just tacky enough to grab and hold those rhinestones, but not too sticky so it wouldn't let go. The other end has a wedge that was perfect for turning over flipped rhinestones.
Please note, I chose not to create a rhinestone template on the Silhouette because this project didn't use many rhinestones and their setting didn't have to be exact. That is next on my project wish-list. :)
To set the rhinestones, I placed a pillowcase over the design and gently pressed straight down with my iron. Then I turned the shirt inside out and ironed it again from the other side.

The finished Easter shirt is the perfect balance of fun and sparkle! Very fitting for my daughter. Do you have someone in your life who would enjoy a sparkly Easter Egg Shirt?

Thanks for stopping by! I hope you enjoyed my project. Be sure to check out all 22 project ideas below. Also be sure to enter the great giveaway at the end of the post.
Want to Check Out More Silhouette Projects?
My Silhouette Challenge buddies and I are all sharing projects on our blogs today, so peruse the projects below for a wealth of Silhouette inspiration!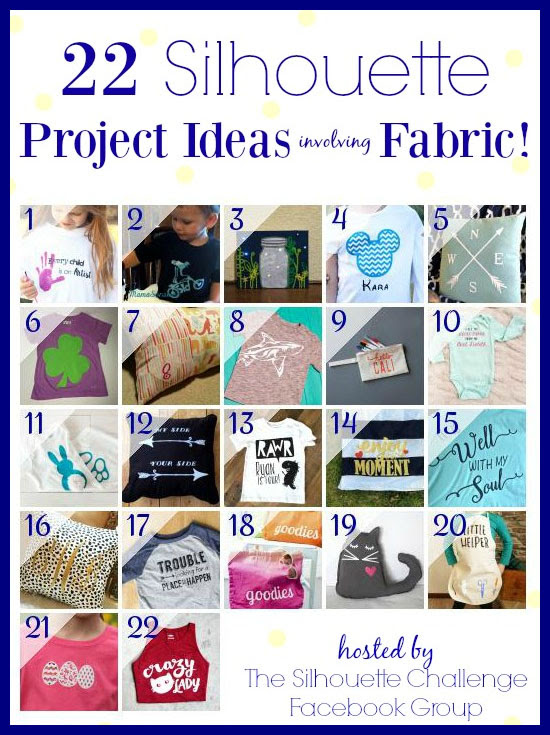
.
1. Cutesy Crafts // 2. Mama Sonshine // 3. Morena's Corner // 4. Simply Kelly Designs // 5. Coral + Mint Design Co. // 6. A Time For Seasons // 7. Architecture of a Mom // 8. Where The Smiles Have Been // 9. Haberdashery Fun // 10. The Thinking Closet // 11. The Crafting Nook // 12. Get Silvered // 13. Tori Grant Designs // 14. From Wine to Whine // 15. Create & Babble // 16. Curly Crafty Mom // 17. unOriginal Mom // 18. The Small Stuff Counts // 19. The Experimental Home // 20. Creative Ramblings // 21. Adventures in All Things Food // 22. Minted Strawberry Heat Press Giveaway

And I’ve saved the best for last! Pro World Inc is giving one lucky reader a Heat Press Valued at $300! Pretty sweet, huh? To enter: just complete the entries in the Rafflecopter widget below. You have 26 potential entries, which means a lot of winning power. So, hurry up and enter! {This giveaway runs from today through Monday, March 21st at 11:59p eastern and is open to anyone 18 years of age or older with a lower 48 U.S. mailing address. You can read the rest of the terms and conditions in the widget below.} a Rafflecopter giveaway


No comments:
Post a Comment
I always love reading your comments and questions. Let me know what you thought about my recipe or post. Comments are currently being moderated due to spam-tastic recent postings. I'll have your comment up shortly. Thanks!