Showing posts with label Back to school. Show all posts

Wednesday, September 3, 2014

One down... and another goes soon!


I never thought I would say this...

I couldn't wait for school to start this year! No. I am not one of those Moms posting pics jumping for joy and embarrassing her kids at morning drop-off. It was a weight off my shoulders though.

Sometimes kids need outside positive influences.


And sometimes Moms need a break. Scratch that, deserve a break!

My 6-year old is a wonderful mess of energy, enthusiasm and inquisitiveness. Some days it bubbles over into being out of control. School allows him a place to not only shine amongst his peers but also burn off that excess energy that even our Border Collie can't seem to match.


Our Summer was a gut-wrenching standoff of rules, lessons on family respect and learning to listen. All important things every child must learn to navigate. And while I have never met anyone quite like this fabulous little guy, I am trying to teach him much more than book knowlege at home.

The truth is my son is much more willing to listen to an outside adult than us. At his age, his teachers are at the top of the food chain and are amongst his heros. From the librarian to the music teacher, we hear all about the amazing feats these people accomplish. They never cease to amaze me in their patience. After just a Summer, I am exhausted!

Now I hope he can take the life lessons we have beeing trying to impart and apply them to his daily school life.


My daughter will be following his lead as she starts Kindergarten this week. The house will seem much quieter without these two.

So no turning back now! The school year has started. It feels like another peice of my heart goes off to school with him each year. I mist up just thinking about how far we have come together in just 6 short years. But I look forward to all the wonderful experiences he will be bringing back to me when he returns on the big yellow bus.


I have a feeling it will be another great year for all of us.
Andrea
Pin It

Monday, August 18, 2014

Protecting my Back to School Investment and Avoiding the Lost and Found

I was provided an Ultimate Back-to-School Combo from Mabel's Labels to facilitate my review. This is a product I already use regularly and am excited to share for Back to School. All experiences and opinions are mine alone.


In the first school newsletter my son brought home from elementary school, I was shocked to learn that every year an entire room of stuff goes unclaimed. From shirts to coats and all student items in between I started to panic about my own forgetful Kindergarten student and the large investment we had just made into his Back to School clothes, backpack, lunchbox, etc.

How much would I need to re-buy over the course of a year?

Fast forward a year and though we had some close calls, a misplaced jacket and a friend of his lost a lunch box, we didn't end up too badly. I credit using Mabel's Labels to clearly mark all his possessions that he took to school regularly.

So this year I am sending 2 off to school, gulp, and am doing all I can to keep my kids from loosing the new items we have been purchasing. As a parent of school aged children, you know how expensive this time of year can be, so why not protect your investment with simple name labels?

For my son I just purchased a simple pack, but this year I got the Ultimate Back-to-School Combo for my daughter. It was a perfect way for me to lable everything easily for the upcoming school year.

Ultimate Back-to-School Combo contains:

  • 2 Teeny Tags
  • 16 Shoe Labels
  • 50 Tag Mates
  • 40 Skinny-Minis

The 2 Teeny Tags I am reserving for my daughter's backpack and lunch bag. I still need to get these items before school starts but I used one on my son's items last year and they were perfect!


My daughter's shoes have all been labeled and this will come in very handy for trips to Jungle Jump, a bouncy castle activity center, as well as when we take off and stash our shoes during Skate Nights at the community roller skating rink.

As I put all the labels in I started to realize that almost everything my daughter owns is either purple or pink. The labels match perfectly!


The Tag Mates were perfect for on the back of her bike helmet, as well as in her coats. None of these are items I want her to lose and at 5 years old, she misplaces things frequently.

The Mabel's Labels are so much cuter than just writing on the kids' items in sharpie. I know my Mom put my name on everything for school, but she didn't have an option like this.


Then I used the Skinny-Minis to go to town on school supplies. This is a lot faster than writing her name out 40 times.


 Now is a great time to order your own Ultimate Back-to-School Combo. There are so many great labeling options at Mabel's Labels for all your Back to School needs, and even around the home as well!

Creating your own custom labels is easy! Just design your labels with your child's name, design options and colors. There are options and icons for both girls and boys as well as various ages. Check out the full Mabel's Labels site to see options for everyone in your life.

What would you label in your life?
Andrea
Pin It

Monday, August 11, 2014

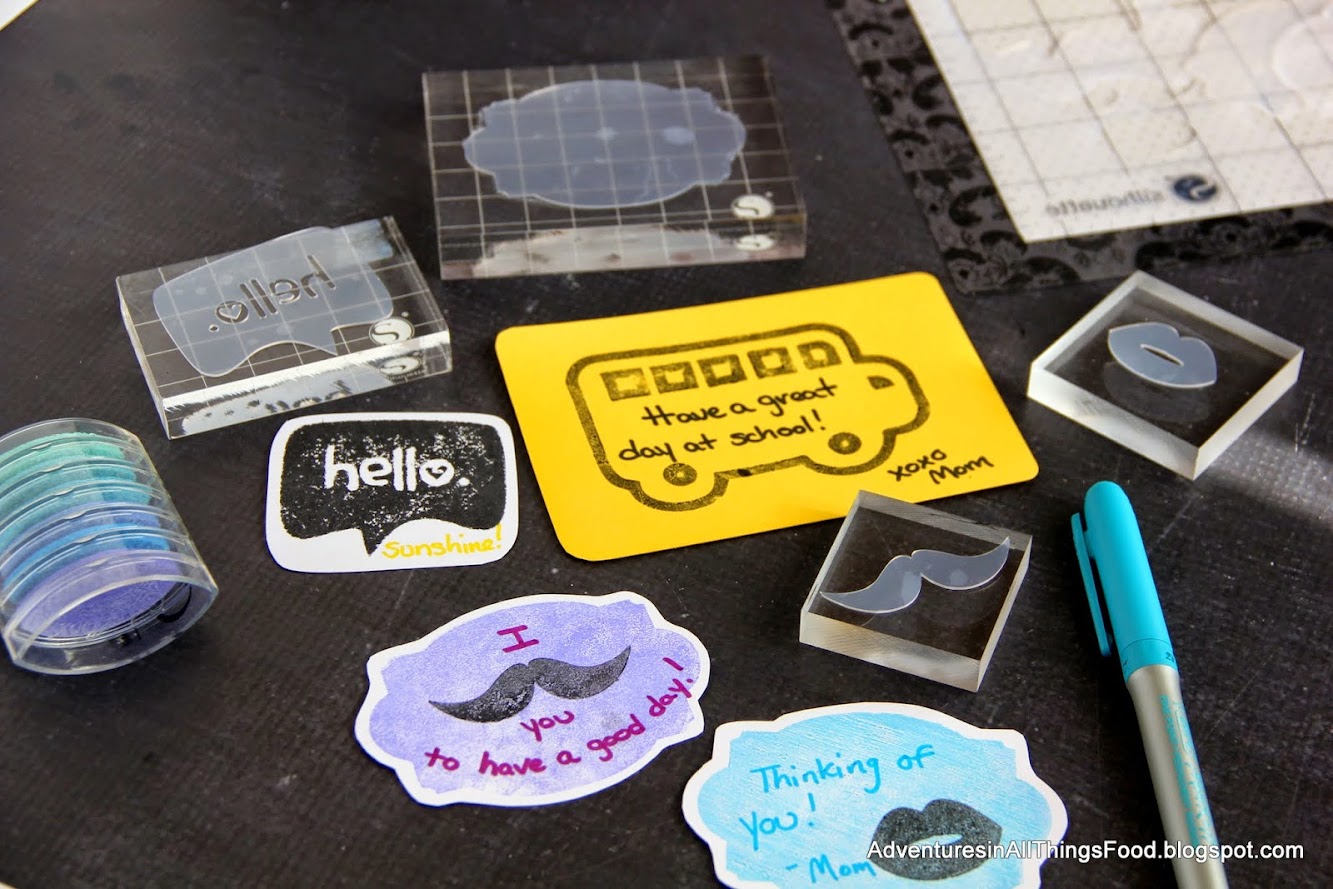
Stamped Lunch Notes with the Silhouette - August Challenge


My Mom would always slip little notes of encouragement or praise into my lunchbox or my backpack as a child. In fact, she still does things like that and leaves them around the house when she visits. It is the little unexpected things that leave a lasting impression.

I didn't do that for my son last year, but now that he is an active and voracious reader going into 1st grade, I think it is time to pass down the tradition. I could have printed out a bunch on the printer, but I really wanted to try out the new Silhouette kit I picked up.

Have you tried the Stamp Kit yet?


I completely geeked out when it arrived. It came with stamp material to cut out with the Silhouette Cameo, a Sihouette Stamp Material cutting mat, acrylic blocks, ink along with instructions and ideas. As with the other kits, there was a card to download a few free images to get me started.

I browsed the image library looking for simple shapes and ideas. I ended up cutting out a school bus, along with a frame and a few other things. Quickly I realized I would need outlines only for my stamps if I intended to write on them. This was the first time I used the offset tool in Silhouette Studio. It gave me a good outline for items like the bus.

Cutting was easy enough. Once the stamp material was placed on the special cutting mat, I used the suggested settings and the material was scored enough so that I could easily pull it away on the desired lines.


Ahem. Pay no attention to the chipped nail polish. I was much more interested in getting my project completed...

I love the grids on the Silhouette acrylic stamp blocks to not only line up the stamp itself, but position it on my card stock. The blocks were also handy for straightening the edges of my outline. The material does have a tendency to stretch a little.

Just press the stamp down on the block and you are ready to start stamping. It pulls right back up afterwards for better cleaning and to reuse the blocks with different stamps.


My only issue was getting the ink to stick to the stamp material. This is the Silhouette ink that came with the kit. I did enjoy using other ink pads more, but the effect of the splotchy ink is kinda fun.


Creating my stamps was easy and I have more ideas to try. I hope to have a whole stack of little notes ready for the first week of school. I may even make a few to stick in my husband's truck.... just because.


Have you created stamps with your Silhouette? What would you like to make?

Want to Check Out More Silhouette Projects?

My Silhouette Challenge buddies and I are all sharing projects on our blogs today, so peruse the projects below for a wealth of Silhouette inspiration!

  Back to School: Printable Book Cover Labels Back to School: Personalized Bag Tags DIY Chalkboard Vinyl Calender  Stamped Lunch Notes with the Silhouette - August Challenge Personalized Classroom Sign for the Teacher Apple earrings for that special teacher School Supply Organizer (Teacher Gift) Easy Vinyl Embellished Bookmarks Chalkboard Place Cards Fabric Tear Away Notepad LEGO inspired Printable Backpack Tags {FREE PRINTABLE} First Day of School Photo Prop Back to School: Personalized Notebooks Back to School: Geometric Paper Bag Textbook Covers Easy Back to School Teacher Gift & Printable Frozen Inspired Pencil Toppers First Day of School Photo Keepsake Giving School A Little Boost
1. Weekend Craft // 2. From Wine to Whine // 3. Life After Laundry // 4. Adventures in All Things Food // 5. Dragonfly & Lily Pads // 6. Sowdering About // 7. The Kim Six Fix // 8. Architecture of a Mom // 9. greylustergirl.com // 10. Please Excuse My Craftermath // 11. Simply Kelly Designs // 12. My Paper Craze // 13. Sweet Tea & Saving Grace // 14. Black and White Obsession // 15. Ginger Snap Craft // 16. It Happens in a Blink // 17. Creative Ramblings // 18. Little Blue's Room

Andrea
Pin It

Sunday, August 10, 2014

Cool Kids' Dessert - Lemon JELL-O Pudding Cake with Lemon Cool Whip Frosting

This #AddCoolWhip shop has been compensated by #CollectiveBias, Inc. and its advertiser. All opinions are mine alone.


My kids are so excited this week because they will finally get to meet and greet their new teachers. We already have the class lists but this will make it real for all of us. School is still 3 weeks away, but will bring big changes for both of them. My daughter starts Kindergarten and will be going half day. My son will be facing a full day of 1st grade this Fall. I want to make sure that I keep some yummy recipes up my sleeve as they brave these new waters and grow up so quickly. I know it will be both exciting and maybe a little scary for  them and they will work up quite an appetite.

Did you have a favorite after school treat?  I loved the sweet and simple treats after school. JELL-O pudding was always a favorite, made even more enjoyable with a little dollup of Cool Whip on top. I was inspired by those after school memories to make something I knew my children would get excited for - a Lemon JELL-O Pudding Cake with a Cool Whip and Pudding Frosting.

Cake is always a reason to celebrate around here, but by using these classic ingredients I have also made it super easy for this busy Mom to pull off. Not your typical tiered layer cake, this is as simple as a cupcake, but the kids will be over the moon to come home and see it.


I just needed a few simple ingredients and grabbed them on a recent trip into Walgreens. Actually I always like to have both Cool Whip and JELL-O Pudding Mix on hand for whenever the inspiration strikes.

You can grab a $1 OFF Coupon for Cool Whip and JELL-O Pudding Mix while supplies last. (SAVE $1.00 when you buy ONE (1) tub of COOL WHIP Topping (any size) and TWO (2) boxes of JELL-O Pudding Mix )


I have made this type of cake a few times. The flavors can be changed to suit your tastes, and the JELL-O Pudding Mix creates a very moist and flavorful cake. I do have to recommend the lemon though.


In order to create my little mini layer cakes I found these darling little pans. One set is of 3 tiny pans. Just a miniature version of a regular tiered layer cake. The other pan is just a mold of a 3 tier cake. Isn't that easy? No stacking or frosting between layers. After baking allow the cakes to cool then trim off the tops with a serrated knife.


Have you ever made a Cool Whip and JELL-O Pudding frosting? It makes the best frosting! While a buttercream can be thick and very sweet, this is so simple and full of flavor. Feel free to use your favorite JELL-O Pudding Mix. I chose lemon, but vanilla is a close second.

When everything is frosted, just refrigerate until you are ready to serve.


My kids love any chance to help in the kitchen so half of the fun for them was to decorate with an array of candied jimmies and sprinkles. My son went straight for the candy flowers.


The Cool Whip frosting is soft enough that all the little sparkles and candies stuck easily. No need to press anything in.


Behold the masterpeice my 4 and 6-year old created on their cake. I am pretty sure they would have used every single sprinkle in my decorating kit if I would have let them. But, they had a blast.

I also created one for my husband as an after work treat. Yeah, even busy parents appreciate delicious recipes.


Lemon JELL-O Pudding Cake with Lemon Cool Whip Frosting
Print Friendly and PDF
You will Need:

Cake
  • 1 box lemon cake mix
  • 1 box (3.4oz) JELL-O Lemon Instant pudding Mix
  • 1 cup canola oil
  • ½ cup milk
  • 1 c. sour cream
  • 4 large eggs

Frosting

  • 1/2 c. cold milk
  • 1 (3.5 ounce) JELL-O Lemon Instant Pudding Mix
  • 2 c. Cool Whip

  • Assorted sprinkles, candies or jimmies for decorating

Preheat the oven to 350 degrees, place a cookie sheet in the oven during heating. Grease all the cake pans well with cake release or non-stick spray.

In a stand mixer mix all the ingredients together except for the eggs. Add the eggs one at a time until incorporated. Beat the cake batter on medium for 2 additional minutes. Divide your cake batter between your greased cake pans, place small pans on the cookie sheet. Bake for 20 to 25 minutes or until an toothpick comes out clean.

Cool completely in the pans. Trim excess and then turn out onto a cooling rack. Wrap and let sit overnight.

When you are ready to frost the cakes, In a stand mixer beat the milk and JELL-O Pudding Mix till it starts to firm up. Fold in the Cool Whip and refrigerate for at least an hour.

Frost the cakes and decorate with assorted sprinkles, jimmies and candy. If making a tiered cake, insert a skewer in the middle while decorating so it holds together.

Enjoy!


I am not really sure if my kids enjoyed decorating or eating their cake more. My son tried to snag my husband's, but I wouldn't let him. We had so much fun this afternoon.

Wrapped tightly in cling wrap, I froze the remaining cakes to make up later. Won't my kids be surprised when we do this again after a long day of school? 


Check out more delicious recipes using Cool Whip on KraftRecipes.com.

How do you fit Cool Whip and JELL-O Pudding Mix into your kids' desserts?

Andrea
Pin It

Thursday, July 31, 2014

Back-to-School Gift - DIY Teacher's Wreath


I am posting a little later today with my craft after a very eventful morning. Well, eventful because the electricity was out. I had planned to do the last minute hot glueing this morning, but not only does a hot glue gun not heat without electricity, I also couldn't even get my much needed cup of coffee to get my day started. Grrr....

But anyway, today's craft is fast, easy and the kids can even help with the planning and color scheme. We decided to make a Teacher's Wreath after wandering around Walmart's craft section. The kids were going two different directions and finally, after a good deal of squabbling, we decided on a wreath.

I love the look of the dried grape vine wreaths for Fall. I also found the red burlap ribbon, I had some ruler printed ribbon in my stash and we grabbed these wooden apple cut-outs. It ended up costing me just under $7 per wreath.


You will need:

  • 1 grapevine wreath
  • burlap ribbon
  • wooden apple cut-out
  • paint in red, green and brown
  • vinyl to cut with whichever die-cut machine you have
  • mod-podge
  • hot glue and hot glue gun
Start by painting the wooden apples. Let them dry between coats.

Then cut out your vinyl. I put the teacher's names as well as the grade they are teaching this year. With transfer tape I put the words on my painted apples.


I covered each with a layer of mod-podge to seal it. It also made my apples nice and shiny.


Then it is time to assemble the wreath. With the hot glue gun, attach the ribbon all the way around the wreath.  Then create a bow with one or more ribbons and glue this and the wooden name badge onto the wreath. Last, create some kind of hanger for the wreath to be displayed. I decided to create a simple loop at the top.

If you are getting set for back-to-school, what about making your favorite teachers their own little welcome wreath?


Andrea
Pin It

Wednesday, September 4, 2013

#Ad To Your School with Tyson Products and Safeway

I am a member of the Collective Bias®  Social Fabric® Community.  To support local schools I shopped at Safeway for participating products in Tyson's Project A+ Program. This shop has been compensated as part of a social shopper insights study for Collective Bias and its client. #ClipForSchool.

Safeway Tyson

My son started out on his great school adventure this past Tuesday.

Kindergarten, already? Can you believe it?

Of course we have been preparing, both mentally and physically, for weeks now.  Yes, I was the Mom doing timed practice drills down to the bus stop in the morning. On the first day my son could barely contain himself as he waited for the big yellow bus.

Kindergarten

Yes, there was a lot of bouncing involved.

He had a fabulous first day and beamed through till bedtime. It made me feel good that he started out his education on the right foot. Now I just want to keep it all so positive. I would love to volunteer in his classroom and help with school events, but with a 2 month old baby and another young child at home, I just don't have the time to give right now. Luckily there are other ways I can contribute to our school.

Do you shop at Safeway? I stopped by our local store to learn there were multiple ways to do my weekly shopping and support my son's school at the same time.

Safeway is currently running a Back to School 10% School Donation Program. Just look for the shelf tags like this one:

Safeway Donation Program

This program runs from August 14th through September 10th. There is still time to take advantage of this opportunity. Just register your Club Card so 10% of the net purchase price will go to the school of your choice automatically, or follow instructions on the bottom of your receipt after you get home. eScrip supporters earn automatically.

Safeway also stocks a variety of Tyson products, many of which are eligible for Tyson's Project A+ Program. I found a handy sign on the outside of the freezer case with a quick explanation of how it works.

Project A+

I can only imagine the fun things a little extra cash could fund at my son's school. On our last visit to the elementary school my husband and I remarked how they could really use updated playground equipment and supplies. The volleyball net was tattered and they can always use new balls and supplies for the students.

The beauty of this program is anyone can get involved. That means not only can you get other parents and teachers involved, but ask your relatives or friends to clip labels as well.

The Tyson Project A+ site was easy for me to use.

Tyson's Project A+

Check to see if your school is already listed, if not it is easy to get enrolled. Sign up took just a few minutes and my school showed up on the list immediately. There is also a complete list of participating products on the site, and with more than 40 Tyson products listed, there is sure to be something your family will love.

Then clip and collect labels to be redeemed for cash for your school. At 24 cents a label, it adds up quickly and is worth more than other school incentive programs. There is a minimum of 100 labels for redemption. I know I buy enough Tyson products to put a decent dent in the minimum myself.

Easy to #ClipForSchool

Okay, so I shopped at Safeway, accumulated some money and labels for my school and now have Tyson chicken in my freezer. What did I make?

I made this Easy Chicken Caprese Pasta that was on the table in less than 10 minutes! Check out the recipe.

Tyson Chicken Recipe

Easy Chicken Caprese Pasta

You Will Need:
  • 4 Tyson Grilled & Ready Chicken Breasts
  • 1 box Angel Hair Pasta
  • 4 garlic cloves
  • 2 Tbsp. unsalted butter
  • extra virgin olive oil to drizzle
  • 2 large beefsteak tomatoes, sliced
  • 8 slices of fresh mozzarella
  • 1/4 c. fresh basil, sliced thin
  • balsamic vinegar to drizzle
  • kosher salt
Bring a large pot of salted water to boil. Boil pasta according to the package instructions. I prefer Angel Hair because it cooks in around 4 minutes.

Cook chicken according to package instructions. The recommended method is covered in the microwave and cooking times vary depending on the amount of chicken being cooked. Set aside.

In a large saute pan melt the butter and warm the garlic through. Add the cooked pasta and toss to coat. Drizzle with more olive oil as necessary to keep the pasta from sticking.

Plate a serving of pasta and top with a chicken breast, then tomato slices, mozzarella slices and sprinkle with basil. Drizzle the top with balsamic vinegar and sprinkle with kosher salt to taste.

Enjoy!

Connect with Tyson on Facebook for product announcements and promotions.

What does your school need? Are you participating in either of these programs?

Andrea
Pin It

Tuesday, September 3, 2013

Starting a School Career with Kindergarten


No, I didn't cry, but as a Mom I was elated, scared and nervous all at the same time to send my oldest off for his first day of Kindergarten.

Things around here have been just shy of crazy lately. We just got back from PKU Family Camp, my daughter turned 4 and my son started school today. Whew! I have been a little overwhelmed and look forward to settling into a new routine with the family.

I have so many things to share here on the blog, reviews, giveaways and recipes. I just haven't had the time to sit down and write with everything going on. Blogging for me goes in waves. It is a big part of my life, but my family always has to take priority. Without my kids and activities, there wouldn't be much of interest to post here. As a Mom my heart has been focused on other things.


In 2010 I posted this post-it for a Tuesday meme, it seems very fitting today. Though I am thrilled that he has hit this milestone, it is scary knowing that I am not in complete control of his diet and PKU management. So many more things can go wrong.


I broke out the old Japanese bento boxes from my years living overseas and put together a special low-protein lunch for my son. The funny thing is, I was so disheartened that my low-pro bread didn't rise properly. Fate made it fit perfectly in his little lunch box. Of course, it tastes just fine. I made some crock pot apple sauce and filled the smaller portion with dried fruit and sliced vegetables. I hope he likes it.


The big thing about this morning was the bus. My son could barely contain his excitement. The wait was painfully long for his little sister and the baby just fell asleep. So typically my son, once the door opened he was scrambling up the stairs. I only had a chance to grab this one picture. He was beaming and waving from the second seat before I could snap another one.

Seems like I am the only one nervous in the family.

This is the beginning of a beautiful school career! I know my son is going to love it. I wish him the best and the same to all the kids also starting out today.

What was the first day of school like in your family?
Andrea
Pin It