Showing posts with label hair accessory. Show all posts

Friday, February 27, 2015

All Decked Out With Baymax for the Big Hero 6 Release

We are crafting up a storm in our excitement for the #BigHero6Release. This Baymax accessories tutorial and DVD release shop has been compensated by Collective Bias, Inc. and its advertiser. All opinions are mine alone. #CollectiveBias

Last year for my son's 7th birthday we took a group of his friends to the movies to celebrate. The movie my son wanted to see was Big Hero 6. We had all been pretty taken by the movie previews. It was, of course, a huge hit with the kids and their parents as well.

Can I just say, fist bumps will never be same!

So in anticipation of the DVD release this week, we decided to craft up some Baymax fun, starting with a necklace of our favorite character out of the easy to work with Crayola Air Dry Clay.

Baymax Necklace

I used several colors to create a Baymax bead, multi-colored Chem-Balls from Honey Lemon and microbot beads. Here I used: yellow, pink, purple, glitter blue, white, black and metallic silver.


To create Honey Lemon's Chem Ball beads, I rolled out a small portion of clay. Be sure to put down wax paper to protect your work surface from pigment in the clay. The clay also picks up any lint or oils, so having a clean work surface helps to keep creations looking their best.


With a tool or toothpick, poke a hole through the center of the ball of clay, I like to use a sharp tool to start with so my ball doesn't become distorted when pierced. Then I go back with a wider tool to enlarge the hole for easier stringing later.


I also created the Baymax bead in a similar way. I made a slightly larger bead and formed it into an oval. I used black seed beads to create the eyes and then a permanent marker to draw a line between them.


After the beads dry for a day or two, they are ready to glaze. A simple coat or two of glossy glaze will make the beads shiny and smooth.


Then they are ready to string in a necklace. My daughter was very excited. She is all about jewelry right now and this unique necklace has all her favorites; Honey Lemon's Chem Balls, Microbots and Baymax, himself.


Felt Baymax Applique

Of course, we needed something to go along with her necklace. I have been big on personalizing my daughter's clothing lately. Her plain black pants were perfect for embellishing with some Baymax fun. There is no need for an embroidery machine. All you need for this craft is a little felt, embroidery thread, an iron-on interfacing and an article of clothing to embellish.


I found an image I wanted to use in the right size and cut out my felt. I used a dressmakers pencil to sketch the eyes for embroidery. The pencil color wipes off the felt easily.


I used a backstitch between the eyes and then the seed stitch for the eyes themselves. I used iron-on interfacing to attach the felt to the pants and then stitched around the edges by hand.


It was the perfect way to make my daughter's play clothes extra special. Even better for playing with her new Flying Baymax.


Baymax Felt Hair bow

And last, I made my daughter a big red hair bow with her favorite character. If you have visited my blog before, you know my daughter loves hair bows and ribbons. I also enjoy creating new ones for her to wear.

These are so simple to make, and a great way to show how much you enjoy the movie, Big Hero 6.


I created a larger, flatter Baymax head out of the same air dry clay. After drying I glazed it and then cut out a piece of red felt. A smaller strip will become the center of the hair bow.


Bring the edges together and hot glue them to the middle.


Then fold over the middle and add a drop of hot glue.


Wrap the center around the front of the bow and over an alligator clip to secure it.


Glue the clay Baymax to the front and you are done!

Now my daughter is all decked out and ready to enjoy the movie again. My son and I ran into Walmart to grab a copy. He was really excited for a chance to see the movie again.


We purchased the Big Hero 6 Blu-Ray/DVD+ Gift With Purchase Set. It includes a digital movie on Vudu while supplies last! Just scan your receipt using the Savings Catcher in the Walmart app. Then look for a message by phone or email. Then you will be able to watch Big Hero 6 on any of your devices.

My son was also thrilled that the added DVD gift was The Science of Big Hero 6. With robotics, microbots and electro-magnetic suspension it is perfect for my little budding science fan.


Now, with all this to enjoy, don't forget to check out the fun Big Hero 6 toys available at Walmart. Be sure to take a peak at the selection when you pick up your copy of the DVD.  I grabbed mine online and had this Flying Baymax  and Hiro delivered right to my home. The kids proclaimed me the best Mom ever.

 What can I say? I am a big fan, too.


What does the larger than life character of Baymax inspire you to create?

Andrea
Pin It

Thursday, February 12, 2015

Crochet Heart Headband

Did you catch those sweet little crochet hearts I have been making? I posted a picture earlier in the week on Instagram and Facebook because I was so excited.


The real surprise is that I have finally figured out a simple crochet project. It is no secret that I have been trying to teach myself crochet for the past 10+ years and own an army of "Learn to crochet" and "Crochet for Dummies" books.

Sadly, nothing seemed to help.

My granny squares turned out all wonky and I was frustrated.

I watched various family members with their crochet projects as I was growing up. I remember the amazingly delicate lace snowflakes my Uncle created for his Christmas Tree. Then there was my Aunt on the other side of the family who was famous for making us all afghans. But, I never asked for anyone to teach me. Now I really regret that.

I was introduced to knitting as a young child by a babysitter and I have loved the clack of the needles and rhythmic work of knitting and purling ever since. No one else in my family knitted and I was always the fiber art oddball. But when it came to crochet, I was all thumbs.

I stumbled across a photo last week of someone learning how to crochet these hearts... they posted their progress and even linked to the site where they found the pattern  and a great video tutorial. The gal over at EverythingEtsy.com has a wealth of simple crochet patterns, and other craft ideas for that matter. After watching her video a few times, it all clicked.


Of course, after I had made about 10 of them, my husband looked at me and asked, "So, what do plan to do with those?"

Um...

I could string them up and create a banner... but, didn't really want to. No, I hadn't really thought of what I wanted to make them for. For me it was all about FINALLY being able to make them.

Of course my daughter had a solution for me. "Mom, are you making me a headband?"

"Sure, honey." Yes, that seemed like a perfect place to start at least.


So I hunted around for a little bit of spare FOE. This happens to be from my stash of cloth diaper supplies... that I never got around to using. Yeah, don't think you are going to take up a new sewing hobby when  a baby comes. Sleep is much more important.


I measured out a bit of FOE to fit my daughter, then tacked my little crochet hearts down to the elastic. Keep in mind that the FOE will stretch, so put them closely together or make the FOE a little longer.


And that is how our little Crochet Heart Headband was born. Seems like it has been over 10 years in the making...


Pin It

Monday, January 12, 2015

Personalized Hair Bow Organizer - January Silhouette Challenge


With my daughter's new vanity came a need to help her organize her hair supplies. Yes, I love adding to her collection of clips, bows and headbands, but I needed a better way to keep it organized and ready to use.

January is one of my favorite times to clean, de-clutter and organize things. It helps me to break up the rainy cold days indoors. And this also fit in perfectly with this month's Silhouette Challenge theme: Organization. This year there is a new twist for the challenges, there is an extra challenge to use a certain technique or material and this month it is vinyl.

So I wanted to personalize a plaque for my daughter using a distressing technique and then adding on the ribbons and hanger to create a place for hair clips and ribbons.


I picked up an unfinished wooden plaque, paint and a distress ink stamp pad at the craft store. I originally wanted to try distressing the paint, so that color would show through, by using vaseline. I have seen a few blogs recently using the technique.


First I started with a base coat of primer and paint in one. Then I painted the wood pink and used the petroleum jelly so my top coat of white would peel off and reveal the pink.


Sadly, it didn't quite work like I had hoped. I still want to try this technique again. But, this time I went ahead and painted over the spots and finished off my board with sandpaper and a little elbow grease.


The final step, and the one I enjoyed the most was using the distressing ink. I found a nice brown that would help to really detail the edges and curves of the painted board.


Then for the vinyl step with my Silhouette I created my daughter's name in script font. When using a weld-able script font, just go under the modify menu to "weld" the letters together. This takes out the lines between them and will make it one continuous cut. Isn't that cool?

How did I go this far without learning that?


With transfer tape, I centered the vinyl and placed it on my board.


Then I outfitted the back of board with a simple hanger and tacked down the ribbon with upholstery tacks and a little wood glue underneath.


I was really pleased with the finished project. My daughter loved that it was pink, but also white to match her new vanity, and had her name on it.


Well, now I have even more to keep creating more hair bows for my little girl. What do you think? Do you know someone who could use a Personalized Hair Bow Organizer of their own?

Want to Check Out More Silhouette Projects?

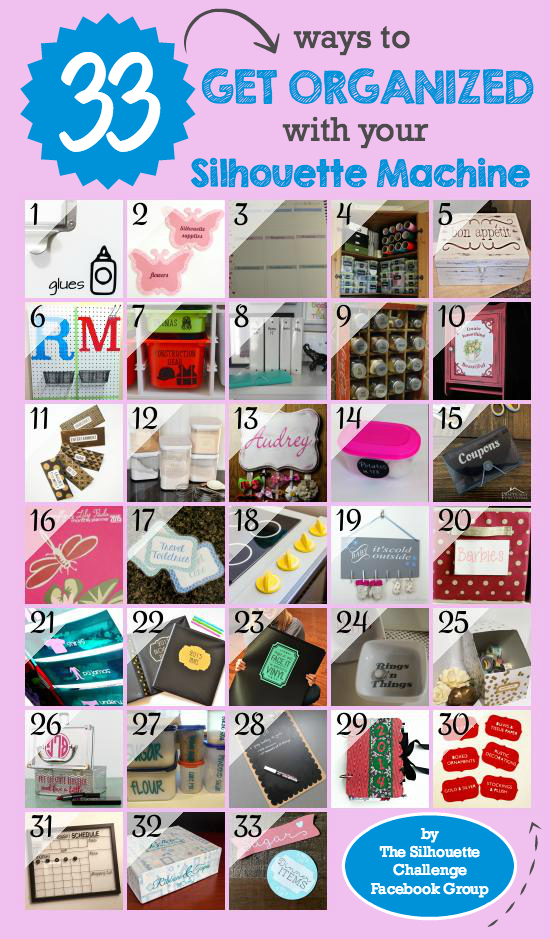
My Silhouette Challenge buddies and I are all sharing projects on our blogs today, so peruse the projects below for a wealth of Silhouette inspiration!

Organizing With Icons Butterfly Labels Customizing Your Erin Condren Life Planner Weekly Layout Organizing Your Craft Supplies with Labels Weekly Menu Box Peg Board Entry Way Order In Kid Land A Fun Way to Label Binders Sugar and Spice Looking Oh So Nice Turning a Plain Cabinet into Something Beautiful DIY Cash Budget Envelopes Flour and Sugar Pantry Container Labels Personalized Hair Bow Organizer Organize your Refrigerator DIY Vinyl Decorated Coupon Organizer 2015 Blog Planner Designed For Dragonfly & Lily Pads Laminated Labels with Your Silhouette The Secrets of How We Built Our DIY Play Kitchen Creative Way to Dry Winter Mittens Organizing Canvas Toy Bins with Labels Kids Closet Storage {with Rubbermaid Drawer Dresser and Vinyl Labels} Cute Gold Binder Labels {2015 Organization} Easy Vinyl Storage Organization and TWO Free Cut Files Personalized Ring Holders Upcycle for Organization Organizing Makeup with Style: A Monogrammed Makeup Case Vinyl Tupperware Labels How to Make a Chalkboard Clipboard Christmas Card Memory Book Simple DIY Holiday Storage Labels DIY Vinyl Frame Calendar with {FREE CUT FILE} Ribbons & Tapes Upcycled Organizing Box Print and Cut Pantry Labels
1. Please Excuse My Craftermath... // 2. Simply Kelly Designs // 3. Daily Dwelling // 4. Ginger Snap Crafts // 5. Our Southern Home // 6. Sowdering About // 7. The Moberg Family // 8. Decor Adventures // 9. Pineapples and Pinecones // 10. Patina Paradise // 11. The Thinking Closet // 12. It Happens in a Blink // 13. Adventures in All Things Food // 14. From Wine to Whine // 15. Practically Functional // 16. Dragonfly & Lily Pads // 17. unOriginal Mom // 18. One Dog Woof // 19. Creative Ramblings // 20. My Favorite Finds // 21. Create it. Go! // 22. A Prudent Life // 23. Where The Smiles Have Been // 24. Barb's Life // 25. Everyday Paper // 26. Pitter and Glink // 27. Peanut Life Adventures // 28. Feto Soap Blog // 29. Our Rosey Life // 30. Two Purple Couches // 31. My Paper Craze // 32. TitiCrafty // 33. Lil Mrs Tori

Andrea
Pin It

Thursday, January 8, 2015

DIY Felt Hair Bows


It's Thursday and that means it is time for a simple and fun craft. It has taken me a while to recover from all the excitement and craziness of the holidays, and I am still working to shake a sinus infection, but I really am itching to share some fun crafts. This is one perfect for any little girls in your life.

For Christmas, Santa brought my 5-year old daughter a big girl vanity set and I am busy working on getting her organized and personalizing everything for her. Check back on Monday for a Personalized Hair Bow organizer I will be sharing for the January Silhouette Challenge.

But all that new space means I needed to make more hair accessories!

Nothing beats a simple solid hair bow to have in the stash. My daughter has lots of patterned ribbon bows, but no big felt ones. This project took me about 20 minutes total, and that was with taking photos!


Grab your ruler, scissors, felt, alligator clip, and hot glue gun. If you want, I even have a felt bow template you can print off if you want.


Cut out your three pieces of felt and heat up the glue gun.


Cut triangles into your tail piece. You can either fold for an even triangle, or use the template to help.


Grab the largest piece and pinch in the middle. Then fold the edges to the back. With your glue gun, put a dot in the middle fold and hold till it sets. Then flip the bow over and glue down each of those folds.


Put a dot of glue underneath to add on the tail.


Then add a drop of glue under the bow and add the knot piece. Wrap it around the front and trim this piece if necessary. It should wrap around and be glued down to the end.


Put a little glue on the alligator clip and slip it underneath the knot piece in the back.

Now, wasn't that easy? Why not make one in every color?

When buying supplies, know that not all felt is created equal. The better quality wool felt is often thicker and will keep from pilling longer. the red bow I created was out of a higher quality wool. The others were cute, too and made out of inexpensive felt from Michael's.


Andrea
Pin It

Thursday, October 23, 2014

Easy Felt Bat Hair Clips


We are in full Halloween countdown in my house. Costumes have arrived and finishing touches have been made. Somehow I was able to convince my kids to indulge their Mother in one more Halloween night family costume... though both kids chose their own costume for school activities.

I just love Halloween. Not just the costumes and sweet treats, but all the decorations and fun.

So besides costumes my kids each have Halloween outfits, but I still needed a clip or Halloween inspired bow to finish off my daughter's outfit.

Why not just make one?


Yes, I love working with felt because it is inexpensive and fast to work with. Recently though, I got smarter about using and cutting felt. If you don't already use freezer paper for your designs, you should be!

Freezer paper is perfect for drawing (or tracing) images and outlines on. It also is fabulous for stabilizing the wool felt.

Just iron the freezer paper stencil lightly to the felt and cut it out.


 the best part is the stencils can be used over and over. Just apply with heat and the freezer paper easily pulls away from the felt or fabric afterwards.

I stitched the two pieces of felt together with white embroidery floss. and then used my hot glue gun to attach an alligator clip to the back.


Does it get much easier than that?

Now my daughter is ready for Halloween, and I may have to whip up a few more for our friends.


Andrea
Pin It