Showing posts with label cupcake. Show all posts

Monday, December 8, 2014

Butter Rum Cupcakes


Every holiday season I looked forward to a particular warm and festive drink... a mug of Hot Buttered Rum, or Hot Toddy. Rich and warming from the inside out, it is something I save for the holidays.

Hot Toddies are created with hot water, sugar, spices and alcohol... rum, brandy, whiskey, etc., and have been popular since Colonial America. I have to say that I understand why.

Today my fellow bloggers and I are celebrating all kinds of cupcakes (National Cupcake Day is December 18th) and I had to turn my favorite seasonal drink into a yummy cupcake. Okay, I went very light handed on the rum, just a little added to the cake batter, but it is still filled with spices and rum flavoring in a simple butter cake recipe. Nice, right?


The whole house smelled amazing while these little beauties were baking. I think it was all the rich spices.


To top my rum butter cakes, I made a very simple rum butter cream then dashed the top of each with a little more nutmeg. Simple perfection.

And since I know you are dying to jump right into the recipe, here it is. Be sure to check out the bottom of my post for a list of all the other bloggers who wanted to share their love of cupcakes today. Maybe we will inspire you to bake up one of our treats on National Cupcake Day next week.


Buttered Rum Cupcakes

You Will Need:

  • 1/2 c. unsalted butter, softened
  • 3/4 c. granulated sugar
  • 2 large eggs
  • 1 1/2 c. all-purpose flour
  • 1 1/2 tsp. baking powder
  • 1/2 tsp. cloves
  • 1 tsp. cinnamon
  • 1/2 tsp. nutmeg + more for dusting cupcakes
  • 1/2 tsp. salt
  • 1/4 c. spiced rum
  • 1/2 c whole milk
  • 1 tsp. vanilla extract
  • 1 c. unsalted butter, softened
  • pinch of salt
  • 1 tsp. rum flavoring
  • 1 Tbsp. meringue powder
  • 3-4 c. powdered sugar
  • 1-2 tsp. milk, to achieve the correct consistency
Preheat the oven to 350 degrees.

Cream together the butter and sugar in a stand mixer. Add the eggs, one at a time, scraping down the bowl between additions. 

In a large bowl whisk together the dry ingredients; flour, baking powder, spices and salt. In a separate bowl whisk together the rum, milk and vanilla extract. Add the dry and wet ingredients to the mixer, alternating until all is just combined.

Fill the cupcake pan 2/3 full and bake for 12 to 15 minutes, until a toothpick comes out clean. Let the cupcakes cool completely before decorating.

To make the buttercream, beat the butter in a stand mixer. Add a pinch of salt, rum flavoring and meringue powder. Beat in 3 cups of powdered sugar, 1 cup at a time. Add the final cup slowly, as needed then thin with 1-2 teaspoons of milk to achieve a smooth and pipe-able consistency. 

I piped my cupcakes with a Wilton 3M tip, topped with holiday sprinkles and a dash of nutmeg.

Enjoy!


Today I am not the only baker sharing her cupcakes, there is a whole group of talented bloggers linking up and sharing some sweet treats. So dive right in and see what everyone has been busy baking.

Andrea
Pin It

Friday, June 20, 2014

Cherry Dr. Pepper Chocolate Cupcakes - Young & Hungry Blogger Challenge

I was sent a box of challenge goodies to use for the 6 challenges in honor of the upcoming Young & Hungry premiere on ABC. All opinions and experiences are my own.


Cupcakes are always a fun project. This week though I was baking with a purpose...


I am currently one of 40 food bloggers having a little fun and getting set for the new show on ABC, Young & Hungry. This is actually challenge #3 and you may have noticed some of the talk about #YoungandHungry on Instagram of Facebook.

Our first challenge was to write down the best advice we have received about cooking or the kitchen. Here is mine:


This week was definately something I could sink my teeth into. It was finally about baking and photography. I have included the recipe below, but if you have a moment, please click over to vote for me. Don't worry, you don't need to sign up for anything, just click to vote.


There are still 3 more challenges... and we don't know what they are till they are announced. I hope there will be more baking/cooking involved.  And the premiere of Young & Hungry will be June 25th, Wed. 8/7c on ABC Family.


...and now back to those amazing cupcakes...


Yes, so simple to make... just sub half the liquids in your best chocolate cake recipe for Cherry Dr. Pepper, add in a little extra dark chocolate and you are good. I made a simple chocolate buttercream and thinned it with yet again, Cherry Dr. Pepper. Top with a gorgeous, sweet cherry and enjoy!

Stay tuned here and on my social media channels for the next 3 challenges and more chances to vote your support.


Andrea
Pin It

Monday, March 10, 2014

Create Your Own St. Patrick's Day Cupcake Wrappers and Toppers


You might have noticed that I love decorating cakes and cupcakes here on the blog. Lately I haven't had time to do a full-blown cake and cupcakes give me a simple way to flex my creativity. But, I must spend a fortune on cute little cupcake bobbles. From cute picks and toppers to colorful or themed cupcake papers, it adds up.

AND I have to find a place to store it all. I am pretty much out of room.

So for St. Patrick's Day I couldn't resist creating a fun cupcake, but why not create my own paper wraper and topper? It was easier than I thought with my Silhouette Cameo.

...Oh, and it just also happens to be March, with a paper theme in the Silhouette Challenge. Could this have worked out more beautifully?

I am sure some of the crafters had no problem deciding what to make with paper. But, I was at a loss. I don't scrapbook and I generally work with fabric or fibers. I didn't even have a good stash of scrapbook paper handy.


After I headed into Michael's for paper, I went online to the Silhouette store for options. I found a whole world of shamrocks and lucky sayings. But, I didn't find exactly what I wanted.

Here is where "ungroup" comes in handy.

I found a great cupcake paper pattern - I loved the scalloped edge! Then I found some shamrocks I enjoyed. The cupcake wrappers already were decorated... so I ungrouped them, took off the original embelishments, adjusted the size and orientation of my shamrocks and created a pattern that fit my vision.

And that is where my Silhouette Cameo rocks. I love the possibilities. Maybe soon I will create some wrappers from scratch, but you can always tailor designs to suit your needs.

What do you think?


Something was missing so I layered a stiffer and darker card stock underneath. It didn't take long to cut that out with the cutter as well.


I glued the two layers of the cupcake wrapper together and then taped the back to create a cup. The shamrock toppers were just as easy. I glued them to short lollipop sticks I found in the candy aisle.

With a little tinted buttercream, some white and shamrock sprinkles, I quickly assembled my lucky little confections.

TIP - If you are looking to create a high and well defined frosting swirl on your cupcakes, add a tablespoon of meringue powder as you are mixing your buttercream. It will stay in place and doesn't affect the flavor at all.


Happy St. Patrick's Day!

Want to Check Out More Creative Silhouette Projects?

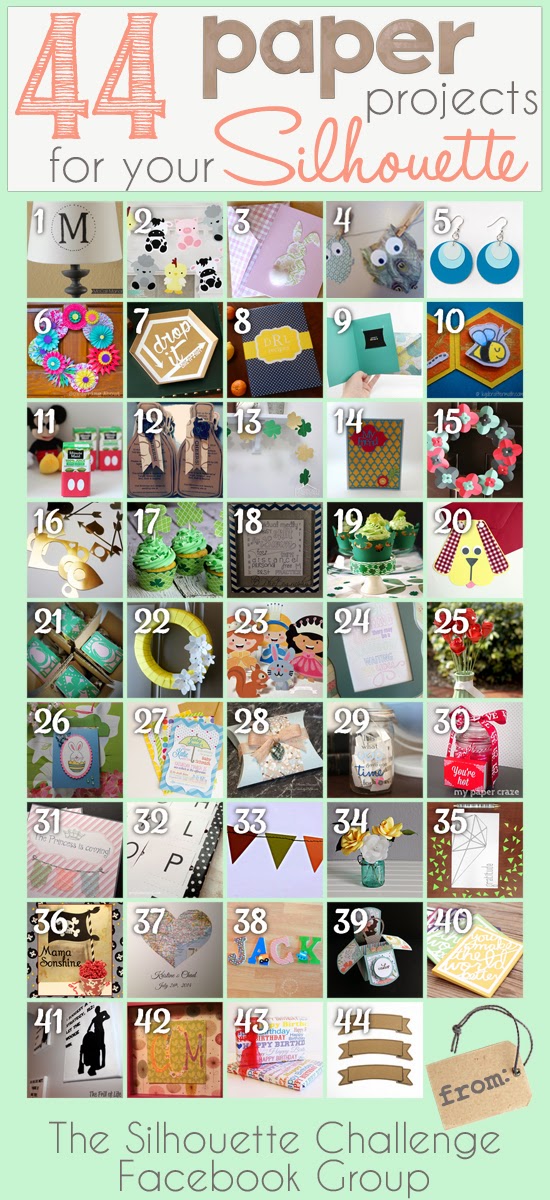
My Silhouette Challenge buddies and I are all sharing projects on our blogs today, so check out all the great Silhouette inspiration! The Great Lamp Rescue Barnyard Animal Paper Garland & Party Details Sweet and Simple Easter Bunny Card Owl Theme Baby Shower Ombre Paint Chip Earrings & Free Cut File Spring is Blooming Drop It (Like It's Hot) Hexagon Tray Spruce Up Your RECIPE BOOK Gift Card Giving Free Cut Files Custom outlines for stamps Mickey Mouse Clubhouse Juice Boxes Wine Themed Bridal Shower Learn How To Make A Sewn Paper Garland! Moroccan Thank You Card 3D Flower Spring Wreath For the Love of Paper: Cutting Embellishments Create Your Own St. Patrick's Day Cupcake Wrappers and Toppers Swimming Word Art St. Patrick's Day Lime White Chocolate Chips Cupcakes + Freebie You're invited to a dog party! I'm so Lucky! Spring Wreath with SIlhouette Cut Flowers Tiny Princesses Paper Dolls Colorful Quote with your Silhouette Get Well Bouquet with Persimmon Roses Greeting Card Holder Baby Shower Invitations How-To Create a Custom Pillowbox on Your Silhouette Machine + Free Cut File! Quality Time Jar Matchbox Cover with {FREE CUT FILE} DIY Baby Girl Shower Invitation Candy Alphabet Travel Game Paper Garland Pretty Paper Roses DIY Geometric Heart Journal Hand Made Decorations for a Pirate Party Wedding Shower Gift Heart Map Decoupaged Letters (A scanner + A Silhouette = Spectacular results!) Easter Pop-up Box Card with Sweet Sorbet Designer Paper from Stampin' Up! Better World Greeting Cards Star Wars Silhouette Canvas Monogrammed Gifts Make Printable Gift Wrap with your Silhouette Software Free Printable: Blank Banner with free Silhouette Cut File
1. McCall Manor // 2. The Turquoise Home // 3. Creative Savings // 4. Sandpaper and Glue // 5. The Thinking Closet // 6. Sowdering About in Seattle // 7. Persia Lou // 8. From Wine to Whine // 9. Dream a Little Bigger // 10. Please Excuse My Craftermath... // 11. Play. Party. Pin. // 12. Everyday Paper // 13. Practically Functional // 14. A Tossed Salad Life // 15. My Favorite Finds // 16. The House on Hillbrook // 17. Adventures in All Things Food // 18. A Glimpse Into Barb's Life // 19. TitiCrafty // 20. The Experimental Home // 21. feto soap blog // 22. Creative Ramblings // 23. The Stamp Doc // 24. Ginger Snap Crafts // 25. Simply Kelly Designs // 26. Whats Next Ma // 27. unOriginal Mom // 28. Bringing Creativity 2 Life // 29. Cutesy Crafts // 30. My Paper Craze // 31. Create & Babble // 32. Grey Luster Girl // 33. The Sensory Emporium // 34. Lil' Mrs. Tori // 35. Black and White Obsession // 36. Mama Sonshine // 37. Weekend Craft // 38. Creative Carnival // 39. Peace, Love and Joyce // 40. Tried & True // 41. The Frill of Life // 42. Dragonfly & Lily Pads // 43. Get Silvered // 44. Minted Strawberry

Andrea
Pin It

Monday, October 1, 2012

The Training Wheels Are Off & Celebrating With #CoolWhipFrosting


I have a 5 and 3-year old. Our life is filled with little everyday moments to be cherished, celebrated and remembered. Right now my son is learning to ride his bike without training wheels. This is a huge step in his life and ours.

I always think of riding a bike as a simple thing. People often talk about things being easy to remember, "like riding a bicycle." But, after watching my son on his bike, I see it from a whole new perspective. My son gets so easily frustrated and wants to quit. My heart brakes for him when he says he's finished and wants to go inside. I want to share the love I had of riding my bike all around the neighborhood as a child with him.


My husband and I have very different teaching styles, but we both have the same goal. My son is ready to ride on his own and I wanted to show him how proud I am of all his hard work. A simple, "I'm so proud of you!" goes a long way, but today I wanted to do something extra special to celebrate this riding lesson.


My kids love it when I bake, but I don't always have time to make something special from scratch. To celebrate this everyday moment I wanted a fast and simple treat my 5-year old could make with me. This recipe ended up being so easy, he made it almost entirely by himself.

So we headed to our local Walmart for all the supplies I needed.


Have you tried the new #CoolWhipFrosting yet? I found it in the desserts and toppings area in the freezer section. In fact, it is right next to the other Cool Whip products. I was excited to see it came in 3 flavors, cream cheese, chocolate and vanilla. For this project I used the cream cheese, but picked up all 3 flavors to have ready in my freezer for next time we want to celebrate an everyday moment.

I was thrilled that the frostings were okay for my children to eat with their metabolic condition (PKU). That is why I usually keep Cool Whip topping on hand. It comes in handy as a dessert topping alternative.

You can follow my entire shopping trip in my Google+ album.


Because Fall is here and I love seasonal flavors, I chose a Pumpkin Cupcake recipe to make. This one is super easy because it uses a boxed mix base with only a few added ingredients. My kids love decorating their own cupcakes, but I made it a special treat for my son to help me make them.


At 5-years old my son is pretty comfortable in the kitchen. He broke the eggs himself, added the ingredients and even scraped down the sides of my mixing bowl. I operated the mixer and scooped batter into the cupcake liners.


The Cool Whip frosting is so easy to use! Just take it out and let it thaw on the counter. I used some to pipe onto my cupcakes with a ziplock bag. Just snip off a corner and gently squeeze. Since this was a simple everyday treat I didn't feel the need to even get out the decorating tips. I am thrilled at the frosting consistency. It was easy to mound and pipe.


I gave each child a knife, some candy leaves and a sugar pumpkin to use for decorating. The kids had no problem scooping or spreading the Cool Whip Frosting. 


The result? The frosting was a lighter and not overly sweet alternative to the traditionally heavy and rice version. I loved how it had the light taste and feel of regular Cool Whip topping. We all enjoyed the flavor and how it complimented the pumpkin and spices in the cupcakes.


Fast Pumpkin Cupcakes with 
Cream Cheese Cool Whip Frosting

You Will Need:

  • 1 box yellow cake mix (plus the oil and eggs listed on the box directions)
  • 1/2 tsp. pumpkin pie spice
  • 1 15-oz can pumpkin puree
  • 1 tub Cream Cheese Cool Whip Frosting


  • Preheat the oven to 350 degrees. Line 2 - 12 hole cupcake pans with liners and set aside.


Mix the cake ingredients, using the pumpkin puree in place of any water called for on the box. Use a muffin scoop to divide the batter between the pans.

Bake for 25 to 30 minutes until a toothpick comes out of the center clean. Let cool completely before frosting with Cool Whip Frosting.


Find more great recipe ideas on the Kraft Recipe page. Also be sure to connect with Cool Whip on Facebook for product announcements and promotions.


*Disclaimer - I am a member of the Collective Bias™ Social Fabric® Community.  This content has been compensated as part of a social shopper insights study for Collective Bias™ and Kraft Cool Whip.  #CoolWhipFrosting #CBias #SocialFabric
Andrea
Pin It

Tuesday, August 21, 2012

Sweet Peach Cupcakes with Peach Buttercream Frosting #Recipe


Ah, peaches!

You might think the peach and I have a long history. Well, we actually do... but, it has been a bumpy one.

I don't ever remember enjoying peaches. I can't even remember peaches that didn't come swimming in their own juices and canned. Not home canned, mind you. The kind that required a high-pitched whine from an electric can opener.

I do remember a doll. I loved my Strawberry Shortcake collection as a child. I had Strawberry and one of her friends, I believe her name was Peach blush. One of the selling features of the small dolls was they were scented to go along with their character name. The peach gal, she did not smell like peaches. A manufactured sweet that made me feel ill when I held her too close to my nose. Poor little doll. She gave peaches a bad name.


But my husband turned the tide in my anti-peach sentiment. He brought me a real peach... fuzzy, juicy and fragrant. Nothing like the doll. The fruit is just not easy to imitate.

With peach season in full swing I wanted to put it into a cupcake. Now, most of the recipes I saw called for alcohol or cream cheese... but none of them just celebrated the simple goodness of a peach. So frustrated by the gaping hole in my cookbook arsenal I went about combining and creating a cupcake that is more peach filled muffin than sweet white cake. Don't get me wrong, paired with the sweet and peachy buttercream frosting, this is a lovely treat and not just a breakfast snack.

Grab some overripe peaches and let's get baking!


Sweet Peach Cupcakes with Peach Buttercream Frosting

Sweet Peach Cupcakes
adapted from Smitten Kitchen
You Will Need:

  • 1/2 c. peach, pureed
  • 3 c. cake flour
  • 1 1/2 tsp. baking powder
  • 1 1/2 tsp. baking soda
  • 1 tsp. salt
  • 1/2 tsp. nutmeg
  • 3/4 c. unsalted butter, at room temperature
  • 3/4 c. granulated sugar
  • 3/4 c. dark brown sugar, packed
  • 2 large eggs
  • 1 tsp. vanilla extract
  • 1/2 tsp. almond extract
  • 1 c. buttermilk
  • 1 1/2 large, ripe peaches, peeled, cored, and chopped

Preheat the oven to 350 degrees. Line the 30 muffin tins with papers.

In a small saucepan reduce the 1/2 c. peach puree by almost half. Let it cool and set aside.

Sift together the dry ingredients in a medium bowl and set aside. In a stand mixer cream the butter and sugar together for 3 minutes. Add the eggs one at a time, scraping down the bowl in between. Then add the vanilla and almond extract. Add the buttermilk and cooled puree, then stir in the dry ingredients.

Fill the muffin papers 3/4 full and bake for 20 - 25 minutes or until a toothpick comes out clean. Cool cupcakes completely before frosting.


Peach Buttercream Frosting

adapted from Southern Living
You Will Need:

  • 1 large sliced peach
  • 3/4 c. unsalted butter, softened
  • 1 pinch salt
  • 2 Tbsp. meringue powder
  • 1 tsp. vanilla
  • 5 c. powdered sugar

Put the peaches in a blender till smooth. You will need 1/2 c. puree.

Beat the butter and peach puree on medium speed. Don't worry if it isn't smooth. Then add the salt, meringue powder and vanilla till incorporated. Start adding the powdered sugar a little at a time till you reach a thick consistency. Thin with a little water or cream as necessary.

I like the 1M Wilton tip with the large coupler for decorating my cupcakes.

Enjoy!
Andrea
Pin It

Saturday, October 15, 2011

MSCC: Pumpkin Brown Butter Cupcakes

Fall is not only full of gorgeous colors, but such a wonderful mix of seasonal fruit, vegetables and spices. I love having fresh apples and pumpkins on hand to bake with.

Just the other week I made pumpkin puree and am just getting into recipes to use it.

This month I am joining in with Martha Stewart Cupcake Club (MSCC) and they are baking their way through Martha Stewart's Cupcakes cookbook.  Each month a new cupcake is chosen, and this month's selection is from Monica at My Cupcake Journey. She picked the Pumpkin Brown Butter Cupcakes with Brown Butter Icing.
 
Oh, my! These caught my eye when I first flipped through the book. I have had a lot of "Ho-hum" pumpkin cupcakes in the past, but this recipe looked different. 

Packed with pumpkin complementing spices, a bit of sage in the browned butter and a browned butter depth of flavor in both the cupcake and in the frosting, makes this little cupcake something special. The flavors are deep and comforting. My husband and I were both big fans of this one.


I was a rebel with the recipe though, the book called for a very delicate "naked" cupcake without a liner. Though it was a nice look, I really hate washing muffin tins. I enjoy a more grab-n-go approach to a cupcake dessert. Well, at least this time.

As for the rest, I stuck with the original recipe and was not disappointed.

I just love smelling the combination of cloves, cinnamon and nutmeg in the kitchen. To me that is the heart and soul of Fall. Fall is spicy, warm and inviting.  These little cupcakes lived up to all those expectations and then some.

If you bake these I highly suggest finding yourself a little kitchen helper. Mine did a fabulous job and kept all the batter inside the bowl.


Don't forget about the brown butter. It is such a star in this treat.

If sage in a sweet treat has you skeptical, never fear. As the butter browns the sage becomes crispy and wonderful. It permeates the butter with a lovely flavor that complements the pumpkin and other spices so well.

My only issue is cleaning up after making brown butter. I really hate the mess left in the pan. I do have a quick tip to help make clean up easier and will post it at the end of this post.

I loved this recipe! Since it was my first with the club, I expect more great things to come. The cupcake was both moist and rich. The brown butter brought a decadence to the cupcake, but at the same time it wasn't overly sweet. I think it is a grown up flavor to appreciate, but sweet enough that even children would want a bite.

Stop by the Martha Stewart Cupcake Club  to see the other bakers' posts. Next month the group will be making a Ginger and Molasses Cupcakes (p. 52 - 53) selected by Rebecca at Beurrista.


As for my little cleaning tip? Well, browning butter left my post looking a little like this:


Soaking it right away can help, but to really get it clean, put a little baking soda in the bottom. Add just enough water to make a paste and then add in a little of your own elbow grease with a sponge.


Simple enough and you will have a sparkling pot back in no time. I hope the tip helps.
Pin It

Sunday, July 3, 2011

Celebrating with S'mores Cupcakes (#Recipe)

Friends of ours throw a 4th of July bash complete with a fire for roasting marshmallows, a pot luck of goodies and camping in the backyard for the little ones.

Last year I took my homemade marshmallows... do you remember that recipe post last year?

This year they evolved into S'mores Cupcakes with homemade marshmallows.

I made the previous marshmallow recipe the night before so they could set up. Then instead of cutting them into just squares, I cut some out using my star cookie cutter. Then I rolled them in powdered sugar as usual and set aside.

The cupcake is a chocolate cupcake recipe, then they are topped with a simple vanilla butter cream, drizzled with a big of semi-sweet chocolate ganache, adorned with a graham cracker chunk and topped with a homemade marshmallow I toasted with my kitchen torch. With a last little drizzle of ganache, the cupcakes are ready to be devoured.

So, ready for the recipes?

Start by making those marshmallows, and the chocolate cupcakes.

You Will Need:
1 c. Dutch process cocoa
2 c. boiling water
1 c. butter softened
2 c. superfine sugar (put regular sugar in the food processor & pulse)
4 lrg eggs
2 3/4 c. cake flour
1 tsp. baking soda
2 tsp. baking powder
1/2 tsp. salt
1/2 tsp. chocolate extract
1/2 tsp. vanilla extract

Preheat oven to 350 degrees.

Dissolve the cocoa in hot water. Set aside to cool down.

Beat the butter till light and fluffy. Then add the sugar gradually. Add the eggs, one at a time, incorporating fully after each new addition.

Combine the dry ingredients in a separate bowl. Add 1/3 of the flour mixture to the mixer, then 1/2 the cocoa. Alternate and end with the dry ingredients.  Stir in the extracts.

Fill 24 lined muffin tins 2/3 full of batter. Bake for 15-18 minutes. Your toothpick should come out clean. I prefer to bake the night before I decorate, I think the cake is moister this way. Enjoy!

Then you can cut out the marshmallows. I chose a star cookie cutter...


 Then if you have a hand torch, toast the top of your marshmallows. You can also do this under the broiler in your oven, but keep a close eye on them so they don't burn.


Okay, now make your chocolate ganache. I like to simmer 1 c. of cream on the stove. I add it to 8 oz. of semi-sweet chocolate chips. Stir until smooth.

And for our last component... make the vanilla buttercream.

You Will Need:
1/2 c. butter, softened
4 Tbsp. heavy cream
1/8 tsp. salt
1 tsp. vanila
1 Tbsp. meringue powder
1 lb. powdered sugar

Whip the softened butter and then beat in the rest of the ingredients except the powdered sugar. Gradually and slowly add in the sugar. Scrape down the bowl a few times so all the ingredients are mixed in. Beat on high till creamy.


Now top those cupcakes with a little buttercream, with a ziplock or piping bag, add a little ganache to the top of the cupcake.

Stick in a piece of graham cracker and use the ganache to hold on a toasted marshmallow. Drizzle with a little more ganache and you are done!

Enjoy! They will be going fast.

Pin It

Tuesday, June 28, 2011

Chai Cupcakes - A Little Time Out for Yourself (Recipe)

Today we have a break from the Summer heat, so since I normally would grab a warm mug of Oregon Chai, since it is Tuesday, I decided to bake my chai!

These cupcakes have a lovely chai & cream cheese filling and frosting. Chai concentrate makes this recipe fast an easy, especially if you already have a powdered mix you enjoy. This recipe is from The Big Book of Cupcakes which I just bought, and love! With 150 cupcake recipes, it will keep me very busy baking.

Chai Cupcakes
You Will Need:
1/2 c. butter - softened
1 c. shortening
2 c. sugar
4 large eggs
3/4 c. milk
1/4 c. chai tea powder - I use Oregon Chai, but anything you like will work
2 3/4 c. cake flower
2 tsp. baking powder
1/2 tsp. salt

Preheat your oven to 350 degrees.

Mix the dry ingredients together in a bowl (last 3 listed). Set aside

Beat the butter and shortening in your stand mixer till it is light and fluffy. Gradually start adding the sugar. Scrape the sides and bottom of your bowl so all the sugar moistened. Then start adding the eggs, one at a time. Each egg should be fully incorporated before the next is added.

Mix the chai powder and milk together in a small bowl. Make sure the powder is all dissolved.


Alternate adding the dry ingredients and wet,  1/3 of the dry at a time, beginning and ending with the flour. Mix just till incorporated.

Fill baking cups 2/3 full and bake for 15-18 minutes. Set the cupcakes on racks to cool. These are very delicate and light cupcakes. Don't be surprised if they fall a little as they cool. Don't worry, you will cover them with frosting and no one will know!


Chai Cream Cheese Frosting
You Will Need:
1/2 c. butter - softened
8 oz. of cream cheese - softened
3 Tbsp. chai tea powder
2 tsp. vanilla
1 Tbsp. meringue powder -optional, but will give stiffness to the frosting
1/4 tsp. salt
4 c. powdered sugar


For writing:
Wilton's piping gel
brown gel coloring
piping bag
#2 icing tip

Cream the butter and cream cheese in a stand mixer. Add chai powder, vanilla and meringue powder and mix on medium until creamy. Gradually add the powdered sugar and salt. Beat on high for 2 minutes.

For writing, take a small amount of frosting and color it brown. Add enough piping gel to make it a little more fluid. With a bag and #2 tip you can pipe your Chinese characters, or any other message you like. 5 years of college Japanese and I am happy to at least use it on my cupcakes...


From the top going clockwise, I have Love, Friend, Tea and Peace.

For more cupcake fun, be sure to stop by Hoosier Homemade's Cupcake Tuesday Linky.

Pin It