Showing posts with label Valentine's Day. Show all posts

Friday, January 8, 2016

Create Your Own Valentine's Day Seals


Now that Christmas and the New Year are behind us, my kids are already planning all the important details for the next big holiday - Valentine's Day! Around here, January is full of cutting out paper hearts, stocking up on cookie decorating supplies and designing our Valentine's Day cards.

Basically, once the heart-shaped candy debuts on store shelves, we start to discuss what we want to create and share for the big holiday.

I always encourage the kids to make something different and unique to gift. I am already excited about my daughter's choice, we will be making homemade heart-shaped lollipops in an assortment of flavors and hand stamping little bags for them to go in. My son is still thinking about it. I am guessing he will want something Star Wars related...

For my own project,  I decided to make special Valentine's notes to slip into my kids' lunches.  I wanted to make the notes extra special by designing a couple Valentine's Day Seals to stamp into red wax for the outside.

I love the novelty of sealing a letter with wax. A simple word, initials or a symbol would be a romantic way to seal up a special love note this Valentine's Day.  I think you will be surprised at how simple they are to create!


To make the seal, you will need:

  • Sculpey Oven-Bake Clay - any color
  • Letters or symbols for the impressions - I used alphabet beads
  • wire cutters *optional
  • red wax
  • envelopes


Start by selecting your word, initials or symbol. I found these great letter beads that just needed to be trimmed in order to make a clear impression in my seal.


You may find a simpler alternative, but these beads just needed the loops snipped off.


Then I could create my words.


Take a small amount of Sculpey clay to form a stamp. I used roughly 1/4 of the package and created a flat side and comfortable finger grip in the other for stamping into the warm wax.


Press the letter firmly and evenly into the soft clay. XOXO was easy, but if you use a word, be sure to make the imprint reversed so the word will have the correct orientation when stamped.


Then carfully remove the letters from the clay.

Bake the clay at 300 degrees for about 5 minutes, or until dry. As the clay cools it will harden.


Once the clay has cooled, they are ready to be used to leave your seal!

Melt wax onto your closed envelope, enough to cover your stamp. Then wait 20 - 30 seconds for the wax to cool slightly. This will allow it to hold the impression. If you try to stamp it too early, it will get stuck in the impression. Since the clay is now hard, just use a toothpick to remove the wax. Reheat the wax and try again!


It takes a little practice to get the seal impression just right, but I am going to have a lot of fun with these this holiday. I know my kids are going to love opening up these Valentine's letters.


For more craft ideas, visit a few of my favorite bloggers:

Andrea
Pin It

Wednesday, February 11, 2015

Last Minute Butterfly Valentines

I feel like I am doing everything last minute this year. Yes, with the final deadline for class parties looming, I am just finishing up the kids' Valentine's.


This year I am really feeling the crunch because this week not only marks Valentine's class parties (and the treat prep that comes with), but also the Father Daughter Dance and the school is having it's 100 day celebration.

Ever feel like you are constantly getting something together for the kids' school? This week it has been non-stop.

My husband tried to nudge me into getting traditional paper Valentine's... but I just couldn't do it. I think everyone has their own talents and passion, mine involves creativity. I just can't buy the box of perforated cards. Don't get me wrong, I don't have anything against them. I think other Mom's have other amazing talents and strengths that I don't have. I am not organized, I rarely ever look put together, BUT I do create.

My daughter and I scoured Pinterest for ideas and we decided on these two-toned paper butterflies with Smarties.


 I picked up two packs of cardstock paper that would go well together at my local Michael's. Then I headed over to the Silhouette store to buy the cut file for these butterflies. The original is for 3 layers, I just didn't use one of them.

You can buy the file at the Silhouette Design Store - Butterfly , and there are also several other butterfly designs there that would work.


To make them big enough for the candy, I enlarged the design, un-grouped the design then arranged them to fit my paper size.

My daughter is in Kindergarten, so she helped with the glue stick and then writing on the back of each one. Don't you love teaching moments like this? We went over and practiced several letters that are still giving her trouble. This was a great chance for us to talk about her classmates and focus on writing.

Once the strip down the center is glued down, gently bend the top set of wings up towards you. This gives the wings a little more depth.


The final touch was to put on the candy. I used glue spots so they would be easier for eager children. You know the first thing those 5-year olds are going to do is eat the candy!


So this is one set of Valentine's down... one more class worth to go! My son is planning on giving out cuties... now I just have to come up with a wrapper for them.


Andrea
Pin It

Monday, February 9, 2015

Red Hot "Puppy Love" Chow


In a countdown to Valentine's Day on Saturday I wanted to whip up a quick sweet treat to share. I am a big fan of cinnamon candy... gummy bears, hard discs, etc. Growing up it was all about the atomic fireballs and just how hot candy could get.

I like a good challenge for my tastebuds....

But, my husband likes things a big milder. So this sweet snack I tempered with a little milk chocolate. It is both sweet and a little spicy. But red, white and perfect for your sweet tooth to fall in love with.


I just love a sweet snack that is easy to whip up when the mood strikes.

So grab your rice cereal and favorite cinnamon candy.


I also broke out the red candy melts to drizzle the cereal with. I put my cinnamon candies in a bag and busted them up. Breaking them into smaller pieces makes it a little easier to bite into.


Ready to whip up a batch for yourself?

Red Hot "Puppy Love" Chow

You Will Need:

  • 3 1/2 c. rice chex cereal
  • 1/2 c. cinnamon candies, crushed
  • 1/4 c. red candy melts, roughly chopped
  • 4 Tbsp. butter
  • 1/2 c. milk chocolate chips
  • 1 c. powdered sugar
Grab a big bowl to measure out your rice cereal. In a mixing bowl, combine 1/2 the crushed candy, candy melts and 2 tablespoons butter. Microwave at 30 second intervals, stirring in between, until the melts are pourable. Drizzle over the cereal. Repeat the heating process with the remaining 2 tablespoons butter and chocolate chips. Drizzle this over the cereal and toss to coat as many pieces as possible. Pour the cereal and remaining cinnamon candy into a zip top bag filled with 1 cup powdered sugar. Shake until all pieces are coated.

Enjoy! 


What is your favorite Valentine's snack or treat?
Andrea
Pin It

Print and Cut Valentine Pudding Cup Wrappers - February Silhouette Challenge


There has been a lot of Valentine's Day excitement in the house. My kids are talking about their class parties, ice cream sundaes, and what they want to make for their teachers this year. We are opting for paper beads, but I have a few surprises of my own for Saturday.

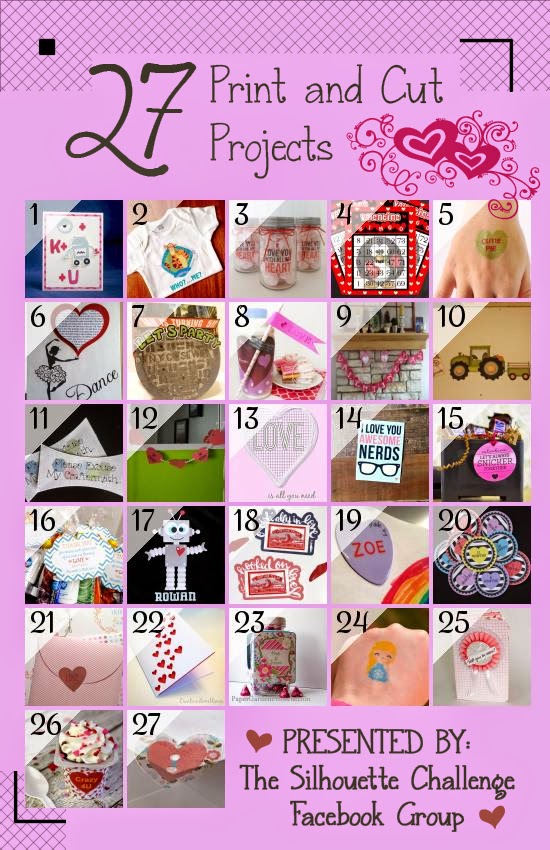
This month's Silhouette Challenge theme is Print and Cut. This is a handy technique to master, but it can also be frustrating. Getting everything designed, printed, registered and then cut out (where you hoped!) can be magically... if it all works out.

Today I wanted to share how I created these cute little pudding cup wrappers, so you could see the process for yourself.

First you need the pudding cup wrapper template. You might remember back before Halloween I shared my Halloween Monster wrappers and shared the full-color printable, but today I am also showing you how to make your own print and cut wrappers. To start, you will need my plain wrapper template.


Open up the template, or whatever you want to trace in Silhouette Studio. Under Object you will find the trace function. This tool really comes in handy for projects like this.


I selected the trace area. Yes, you will notice I only selected one of the wrappers. I prefer to create one wrapper and then group and copy more as needed. Once you have traced, choose outline and you can pull the rest of the image off to the side of your work space.


To fill an object, select the image and then go up and select fill pattern. I purchased this cute heart paper in the Silhouette store. My purchases show up at the bottom of my fill pattern gallery.

Then comes the most important part of creating a print and cut image, Registration Marks.


When you print a design on your printer, the registration marks help your Silhouette line up where to cut. The area of the mat shows up with an "xx" pattern on the screen. You must make your image or designs fit within this area. I took a peek at this point and decided I could fit in one more wrapper.

To finish I added a heart and the words "Crazy 4U". To get just the right shade of gold and red, I used the eye dropper color tool to get the exact shade from my paper pattern.


Then all I had left was to print out my wrappers on my printer, put that sheet with visible registration marks into the Silhouette. The machine looks for those registration marks and cuts accordingly.


So, what do you think? I hope you will try out some of these fun features on your own Silhouette and see how much fun making print and cut creations can be.

And this time around, I really don't mind not having to cut out all the pudding cup wrappers by hand! This is so much faster.


Want to Check Out More Silhouette Projects?

My Silhouette Challenge buddies and I are all sharing projects on our blogs today, so peruse the projects below for a wealth of Silhouette inspiration!

Print and Cut Rebus ValentineTigger Printable Heat Transfer T-ShirtLove You Valentine’s Jar {tutorial} + Print & Cut Blog HopValentine BINGO with {FREE} Printable and Cut FileDIY Conversation Hearts Temporary Tattoos{Heart} Dance!Custom Birthday Party Invitations using Silhouette's Print and CutMilk & Cookies Valentine's TreatPrint & Cut Valentine's Day BannerOld wooden box LovePrint and Cut Fabric LabelsBe Mine BannerLove is all you need - Print & CutValentine Journal CardsFree Printable: Snickers Valentine TagLabor & Delivery Nurse Thank You BagsValentine Robot Shirt with Print and Cut Heat Transfer VinylPrint and Cut Fish Valentines3D Print and Cut Magnets (And Tons More Silhouette Print and Cut Ideas)Baby Month Stickers with a FREE cut fileSuper Easy Print and Cut Journal Card ValentinesSimple Silhouette Valentine CardValentine Hugs and Kisses Canning Jar CraftFrozen Inspired TattoosBe My Valentine Mini AlbumPrint and Cut Valentine Pudding Cup Wrappers - February Silhouette ChallengePrint & Cut Birthday Invitations
1. Clever Someday // 2. TitiCrafty // 3. GingerSnapCrafts.com // 4. My Paper Craze // 5. Simply Kelly Designs // 6. Little Blue's Room // 7. Mama Sonshine // 8. Small Stuff Counts // 9. Dragonfly & Lily Pads // 10. GiveMeAPaintbrush // 11. Please Excuse My Craftermath... // 12. Barb's Life // 13. GetSilvered // 14. Lil' Mrs. Tori // 15. Minted Strawberry // 16. unOriginal Mom // 17. Where The Smiles Have Been // 18. Persia Lou // 19. Silhouette School // 20. From Whine to Whine // 21. DailyDwelling // 22. Creative Ramblings // 23. Paper Garden Projects // 24. It Happens in a Blink // 25. Perfectly Fabulous // 26. Adventures in All Things Food // 27. Create & Babble Andrea
Pin It

Thursday, January 15, 2015

Valentine Inspired Treasure Box


As a child I loved keeping things in special little treasure boxes. Mine were filled with various childhood treasures... seashells, colored rocks, stickers or special costume jewelry rings. Anything I held dear was tucked away in a special place like a treasure box.

None were very large, some would only hold a few coins or a dried flower, but they protected something special to me.

For Valentine's Day this year I decided to create a special little treasure box for my 5-year old daughter so she could keep something special, too.


I started out with an inexpensive wooden box from the craft store. It was around a dollar, but I loved the little window on top.

I wanted to paint it, so I covered up the glass window, I couldn't remove it, with painters tape and used a white spray paint that worked as primer as well as top coat.


After my box was white, I used a Mod Podge washable stencil  to create a pattern on top and the front.


Inside the window I wanted to put some loose "treasures" so I used these little heart jewel embellishments.


I put them in upside-down and left he backing on the stickers so they will move freely inside.


Then I cut out a piece of heart scrapbook paper to fit and put that over, then closed it back up.


The last touch was a little clear, high-gloss finish over the paint.

Now it is all ready for my daughter to fill with something special to her. She was overjoyed at her special little box.


What would you keep in a little treasure box? Did you have them as a child?


Andrea
Pin It

Wednesday, February 5, 2014

Easy Ghirardelli Chocolate Mousse - The Perfect Valentine


With Valentine's Day quickly approaching I asked my husband, "If I was using chocolate, what kind of dessert would you like for Valentine's?"

His answer was surprising. I expected him to ask for a chocolate cream pie, chocolate chip cookes, etc. He asked for chocolate mousse instead.

Mousse? Isn't that difficult?

Luckily it isn't. But the key is using good chocolate. I mean, mousse is pretty light on ingredients.


A Mousse is chocolate and beaten egg whites. Chilled, it is often topped with whipped cream to help cut the decadence. Either chocolate shavings or raspberries are a common garnish. And as simple as it is, it IS amazing!

Smooth and silky on the tongue, it is a special occaision treat that seems much more complicated than it really is. But, does it matter if everyone thinks you slaved away on dessert?

Go ahead and let them think so...


Of course, since chocolate is the star of this dish you have to go with a brand that delivers a high cacao content as well as melts easily for the ideal mousse texture. Our dessert came out creamy and rich, exactly what I expect from Ghirardelli chocolate.

In fact, whenever I am buying baking chips for making cookies or just to have on hand in the pantry, my husband insists that I only buy Ghirardelli. It is made with a propriety blend of quality ingredients and you can taste the difference in whatever you are making. 

I love bittersweet chocolate for recipes like this one, but there is a whole range of Ghirardelli varieties to fit any recipe or chocolate preference you have.


Easy Ghirardelli Chocolate Mousse

You Will Need:
  • 8 oz. Ghirardelli 60% Cacao Bittersweet Chocolate Baking Chips, roughly chopped
  • 3 Tbsp. water
  • 4 large egg whites, at room temperature
  • a pinch of salt
  • whipping cream
  • 1 Tbsp. chopped Ghirardelli chocolate reserved for garnish

Roughly chop the chocolate so it melts faster. In a double boiler add the water and baking chips. Keep stirring until the chocolate has all melted and the mixture is smooth and shiny. Take off the heat and continue to stir till the mixture begins to cool. Set aside.

While the chocolate comes to room temperature, in a stand mixer whip the egg whites and salt to stiff peaks. When the whisk attachment is removed from the bowl, the whites should hold their shape.

Fold 1/3 of the egg whites into our chocolate carefully. Then fold in the remaining eggs. Try to not deflate the mixture, but incorporate the whites and chocolate well so there are no streaks remaining.

Chill for at least 3 hours before serving so it can set up properly.

Serve topped with fresh whipping cream and a pinch of chopped chocolate.

Enjoy!


A double boiler is handy for melting chocolate without scorching, but you can also put a mixing bowl over a saucepan filled with water. Just keep stirring until all the chunks have melted and the mixture is shiny and smooth. 

Before you know it, you will have this amazingly decadent dessert to present your sweetie for Valentine's Day.


I was selected for this opportunity as a member of Clever Girls Collective and the content and opinions expressed here are all my own.
Andrea
Pin It